How to Kendama for Beginners

Starting the journey as a Kendama beginner? Looking for which Kendama to begin with or what tricks to start with?
You've come to the perfect place!
This Kendama guide is divided into two sections:
- Section one - Choosing the best beginner Kendama
- Section two - Start playing with beginner Kendama tricks

Section One:
Choosing the best Beginner Kendama
At Kendama Senses, we have a collection specifically for the best Beginner Kendamas to start with.
Let’s dive into the how and why behind the Kendamas I recommend you choose as a beginner Kendama player.
🏆 Pro tip:
The most important factors for choosing your starter Kendama are:
1. Shape of the Ken (the part that looks like a hammer)
2. Price of the Kendama
3. Tracking the hole in the ball (Tama)
4. Design: How beautiful do you find the Kendama
5. Sustainability: Where / how is it made
After reading this section, you will know exactly what to look for in your Kendama and why!
1. The Shape of the Ken

The Shape of the Ken is the most important factor for how nice your Kendama will play. Over the last 10 years, it evolved immensely.
When you compare a Kendama from 10 years ago and a modern Kendama, you will notice the differences quickly.
The size has increased and the placement of all the subtle ingredients and angles have been optimised.
To keep it short: if you play an outdated Kendama, you will suffer. It's like climbing a mountain on flip-flops vs hiking shoes!
When shopping on our website, this is one thing you don't have to worry about: we specialise in Kendama and only sell modern Kendamas.
There are differences between the Kendama brands that we sell, however for a Kendama beginner these differences are subtle enough that they won't matter to you - yet.
Warning: when shopping elsewhere, it is really common that the people who sell the Kendamas are not players themselves! It's very common that they sell poor quality products, just for profit (this grinds my gears...) Especially in common places like Amazon or other websites listed high on Google.
Supporting a brand that consists of players themselves, helps the whole industry as that brand will reinvest their money and efforts back to the community.

2. The Price of the Kendama
Expensive Kendamas are better than cheap Kendamas, pretty simple, in my opinion! 😊
However as a beginner kendama player you cannot yet make use of the benefits that those better Kendamas offer you. That will come as you progress and unlock more tricks.
So why start with an expensive Kendama?
The recommended Kendamas for beginners range from 20€ to 40€. The difference in price is due to the following reasons:
- Build quality
- Where it is produced
- Design
As a general rule, better wood types are more expensive - anything produced outside of China is more expensive - and nicer designs are more expensive.
The beginner Kendamas I recommend to you are more affordable versions of their premium counterparts. They all share the same Ken-shape, which is what is most important for you.
3. Tracking on the ball (Tama)

One of the most fundamental beginner Kendama tricks is spiking the Tama.
In order to successfully land the spike, you need to know where the hole of the Tama is located.
If there are no marks on the Tama, it’s very difficult to know where the hole is located when the Tama is rotating in the air. This is where tracking comes into play.
As you can see in the picture above, contrasting colours and designs are used that make it easy to locate the hole when the Tama is moving during play.
Luckily, all of the Tamas we provide feature good tracking.
Nowadays, good tracking on modern Tamas is very common. However, one may still be slightly better than another the following properties are guidelines for good tracking:
- Contrasting colours
- Clear patterns
- Light colours around the bevel (hole)
- A tracking dot, on the opposite side of the bevel

4. Design: How beautiful do you find the Kendama
Now this is up to you: Do you value the price or the design more?
Or are you lucky and do you find the cheapest options to have a very nice design?
Kendama is supposed to be fun, and playing with a beginner Kendama that you find beautiful will help you enjoy the game.
That's why the design of the Kendama is important.
Deciding on which Kendama you find beautiful, it mainly comes down to the colours and patterns used. Do you like a playful and chaotic design or rather clean and slick?
I personally like all kinds of designs, but mostly just decide intuitively: would I like to play with this, or would I not?
Easy, right? 😊

🏆Pro tip:
As we only offer modern Kendama products on our site, we've made it easy for you to choose one of your first Kendamas:
- Go to the Beginner Kendamas collection
- Make a decision based on what you value more: Design vs Price
- Feel at ease, knowing whatever decision you made is the right one
- Leave the pre-selected option "Glued spike" for 2€ extra on. I will put a bit of glue on the tip of your Ken, which increases the durability by about 5 times! 🤯
Recommended Beginner Kendamas
Beginner Kendamas
-
Botter Stripe
Regular price €39,95Regular priceUnit price per Sold Out
 -
Crooked n Phat
Regular price €35,95Regular priceUnit price per Sold Out
 -
Sweets Starter - White
Regular price €24,99Regular priceUnit price per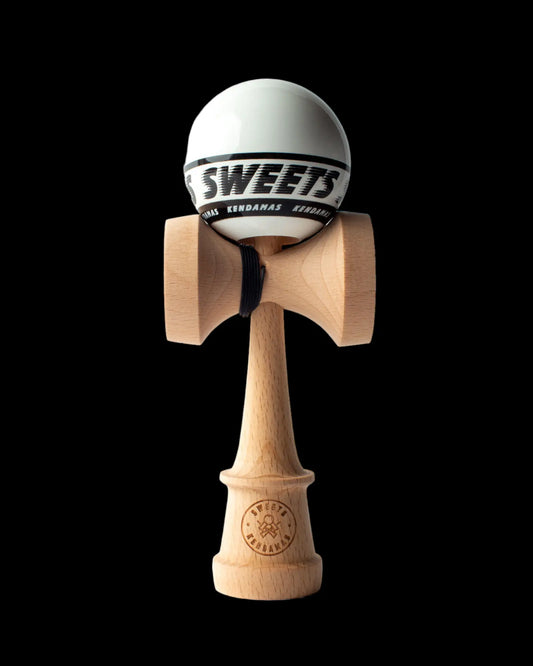
-
Sweets Starter - Green
Regular price €24,99Regular priceUnit price per Sold Out


Section Two:
Learning Kendama tricks
The exploration of Kendama has many similarities compared to learning a martial art or a musical instrument.
Everything you learn will be the building blocks that ultimately form your skill and style.
Read that again. 😊
The following information is taken from the brand Sweets Kendamas.
This brand has arguably been the most influential Kendama company to spread Kendama into the hands of more people.
Sweets provides a lot of tutorials that help new players make their way into Kendama. We share their information on this page.
Check out the beginner Kendama tricks we recommend you try first:
1. Kendama Grips
Learning the grips in Kendama is fundamental.
The video above is really good as you will learn how to hold the grips and why it's important to hold them that way.
When learning a new skill like Kendama, it is important to learn the techniques correctly right from the start.
What happened to me many times during the first years of my beginner Kendama journey, is that I tried to take shortcuts when learning something new.
This resulted in me learning a wrong technique and then later having to find out I fooled myself into not learning it correctly the first time.
Then I had to unlearn the wrong technique and still learn the correct technique after all!
How ironic that trying to take shortcuts actually ended up making the process so much longer and more complicated.
2. The Cups
The cups are one of the first basic beginner Kendama tricks that you can easily learn today, with a bit of practice!
Especially with the tutorial above: Matt Sweets gives a lot of detailed tips that will help you learn those first beginner Kendama tricks with ease.
When learning a new skill, I found that one of the best ways people learn is by alternating your own practice with observing someone else.
This gets you into a good feedback loop: First you explore a bit by trying. Then you can discover new details by observing someone else.
This, in turn, brings you closer to landing the trick when trying again, after which you can discover more new details by observing someone else.
It is quite difficult to put yourself into a situation you are not familiar with. It often takes quite a lot of energy to keep trying, so make sure to celebrate each small improvement!
By practising the cups and trying to understand the tips given in the video, you will soon feel confident with these basic skills and be ready to move on to the next tutorial.
3. The Spike!
The spike! This one is so satisfying to land!
I don't know if it feels the same for you, but at first I didn't believe I was going to do it.
Later, I found out that not believing in it was exactly the thing that made doing the Spike so much harder than it could have been.
The "not believing" part, were actually thoughts distracting me from my attempts on landing the spike.
Luckily I had help: People pushed me to keep trying. When I finally landed it, I felt so satisfied! I proved myself I actually could do it.
My number one tip is to relax, give yourself time to attempt the trick and don't judge yourself. <- That may be even more challenging than the trick itself!
4. Airplane
The Airplane is the first Tama grip trick. You spike the Ken, while holding the Tama.
In the video, Sweets explains clearly what steps you can take in order for you to land the beginner Kendama trick.
When I was learning the Airplane, I had quite trouble getting the Ken to go upside down, so the spike can fall into the hole.
With a bit of practice and going back to the video if necessary, you will surely land the airplane!
Landing the airplane will be so satisfying. This is really something you should experience for yourself, so go and get that trick! 🤩
5. Candlestick
Candlestick is a trick with the Candle grip: yet another way to hold the Ken.
In this video Sweets gives clear instructions on how to perform this beginner Kendama trick. I'm sure you will land it in no-time.
This trick is great for upgrading the collection of tricks you can do. Once you land it, you can immediately see if you can get the Tama to land on the Big and Small cup in this grip.
But don't worry if you can't, yet, as your skills will improve with the next Kendama tutorials.
6. Learn hole control
Hole control is very fundamental for the rest of your Kendama journey, and investing some time into truly understanding this, will help you a lot!
Luckily, Sweets Kendamas has amazing tutorials that cover everything that an experienced Kendama player could teach a beginning Kendama player.
The tutorial above covers a range of techniques, so I encourage you to come back to this tutorial every day for a few days, to try to integrate all the tips and techniques into your skillset.
There are the following techniques to discover and learn:
- Getting the hole to consistently face up when pulling up to Big Cup
- How to Spike from Big Cup (and how not to do it)
- How to Spike when the Tama faces a different direction
- Controlling the hole when throwing the Tama from the Spike to a Cup
- How to Spike from the Small and Base Cup
Learning these techniques will allow you to uncover the mystery of how players can be so consistent at these kinds of tricks.
Seeing your own progression and seeing yourself become more consistent over the course of a day, a couple days and a week, will give you a lot of satisfaction and confidence.
That's why I would recommend you to play a bit more in the beginning: you will feel more progression and that will make beginner Kendama journey a lot more fun!
7. Earthturn
The Earthturn is definitely a players favourite for beginning Kendama players. Flipping the Tama from the Spike, and then landing it back onto the Spike!
Be careful though, the satisfaction of landing the Earthturn can definitely get you addicted to this trick. It will be a lot of fun but I will also encourage you to keep going out of your comfort zone to practice new tricks!
The Earthturn is one of those tricks where you will see yourself progressing and getting more consistent very clearly.
The tutorial also shows you how to do an inward Earthturn, meaning to flip the ball in reverse direction.
In Kendama it's common to learn to do tricks both ways. Somehow doing the opposite variation of a trick, often gives a very different feel to the trick. Being able to land tricks both ways gives you the ultimate satisfaction.
8. Kenflip
When you're starting to learn the Kenflip, is where you are starting to become a real Kendama player.
From this Beginner Kendama guide, this is the first trick where you will be learning to throw both the Ken and the Tama at the same time.
This trick is extremely cool but requires a bit more practice than the other tricks you've done so far.
In the tutorial above, Sweets very clearly explains and breaks down the steps to learn the Kenflip.
Breaking down the learning process of a trick into smaller steps is essential to be able to learn more complex tricks into Kendama.
So keep this in mind and apply this in the rest of your Kendama journey.
If you're having trouble landing the Kenflip, I would suggest paying close attention to Sweets as he shows it in the video and then trying to replicate that same movement.
Another tip I would like to give you, is to pay attention to your progress:
You may not be able to do it within 20 attempts, but after 20 attempts you will be able to see that you have a slightly better understanding of how to do it and what not to do.
This means you are getting closer to landing the trick. It also means that if you keep practising, you will surely be able to do it!
9. Penguin Catch
The Penguin catch is yet another way to catch the Tama on the Base cup.
This one is very satisfying, but does feel a bit odd in the beginning.
One of the real challenges with this trick is to keep the Base cup very flat, so the Tama doesn't roll out of the cup.
The Penguin Base cup trick is great fun to combine with the other cups, as it requires you to make a bigger movement than when you're juggling between the other cups.
It's another beginner Kendama trick you can take with you in your repertoire of tricks when you move along on your journey.
You will find that the more tricks you can already do, the more creative you can become when trying to create new combinations between tricks.
This is why I would recommend you to always learn a new Kendama trick if you get the opportunity to!
10. Clack back
The Clack Back will be one of your first combinations while using the Sara Grip.
It's a really fun way to make use of the coördination you have gotten while learning the tricks before this. It should be a lot of fun while not being too difficult to achieve.
Now that you've learned some basic tricks, it's a lot of fun to start to make some combinations like this one.
And after you've landed this, you can also try to experiment to do the Clack but then catch it on the Base cup, for example!
11. Around the World
Around the World is in my opinion the sickest beginner Kendama trick.
You're putting all of the most fundamental tricks of Kendama into 1 combo.
This is a trick that will keep coming back in a variety of ways on your Kendama journey and a trick that you will likely do every day that you pick up a Kendama in the future.. That's how fundamental this trick really is!
In the tutorial Joshua explains how it's done. He does mention that you should check out the Around the Block tutorial first. However I think you don't need to, so you can decide for yourself!
It can take you some time to do this trick, but definitely check back the tutorial or even ask me for help if you need it.
After you manage to land this trick, you're pretty far in the beginner Kendama tricks and ready to continue your journey into more and more complex tricks.
You can check out the whole playlist of tutorials that I referred to in this article here.
If you're looking for an even bigger list of Beginner Kendama tutorials from Sweets Kendamas, you can find them by clicking on the button below. Make sure to Subscribe to their YouTube channel.
Challenges from Sweets Kendamas
Challenge your skills learned above - Below are Lists you can print and download where you can measure your progress!
Once you land a trick 3 times, check it off the list and move on to the next skill.
List 1
List 2
List 3
In conslusion
In this beginner Kendama guide we learned the most important things to start with: Which Kendama to buy and why, and also which beginner Kendama tricks to start with.
This knowledge will definitely be able to give you a head start. However, I would still imagine that tons of questions may arise in this beginning of your beginner Kendama journey.
That's why I invite you to reach out at any point to ask any of your questions. I really love to help you.
You can use the Chat on this website, but also feel free to reach out to my instagram, Senses Kendama Shop
Lastly, I would recommend you to join my email list, as here I also share valuable information for Kendama players.
The best Kendamas to Start with
Beginner Kendamas
-
Sweets Starter - White
Regular price €24,99Regular priceUnit price per -
Sweets Starter - Teal
Regular price €24,99Regular priceUnit price per
-
Sweets Starter - Pink
Regular price €24,99Regular priceUnit price per

